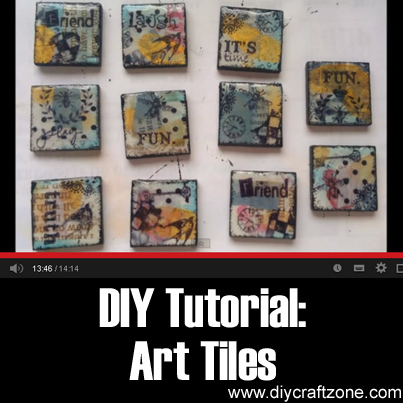
 DIY Tutorial: Art Tiles
Photo – https://www.youtube.com/watch?v=jd1rpU6qTEI
Tiles are typically made of hard-wearing material and used for covering roofs, floors, walls, showers or other objects. however, tiles can also be used as decorative pieces to make your home look more lively and interesting. Many countries use decorative tiles to beautify their homes.
Art tiles are certainly not uncommon, and you can also make some at home! This video tutorial by LivArtNow will teach you how to make gorgeous art tiles! You will have so much fun playing around with different colors, textures, and patterns!
Tools and Materials Needed:
1. One inch tiles, wood, scrabble tiles or polymer tiles
2. White Gesso/Paint
3. Japanese Masking Tape/Tissue Tape
4. Archival Ink Pad/Staz On
5. Clear Stamps/Rubber Stamps to Match Your Project
6. Mod Podge or Similar Multi Medium/Gel To Seal Your Tiles
7. Glossy Accents/Diamond Glaze/3D Laquer
8. Acrylic Paint
9. Thin Paint Brush
Comments/Suggestions:
1. Gesso basically acts as a primer for your artwork. It’s a white paint mixture consisting of a binder mixed with chalk, gypsum, pigment or any combination of these. Applying this as a base will make any colors painted on it look more vivid.
2. Use gloves if you don’t want any paint to stick on your fingers. Place sheets of old newspapers or any pieces of scrap paper to protect your work area.
3. You can buy a lot of art materials at your local craft stores or even online. You can keep a look-out for anything that contains positive words on them like “live”, “laugh”, “smile”, “beautiful”, etc. Use these uplifting words for your project and place your finished products on your picture frame. These words will hopefully remind you that there are a lot of things that you have to be grateful for.
4. You can get creative with this project! If you want to make some art tiles for your kids’ rooms, print out pictures of their favorite cartoon characters! Use glue to stick the paper onto the tiles.
5. If you have lots of nail art stickers that you no longer use, you can also use them for this project.
6. If you want to paint the sides of the tiles black, paint two sides at a time. This will prevent any smearing. Allow the paint to dry before finishing the remaining sides.
7. Use these tiles to decorate almost anything! Notebooks, boxes, picture frames, albums… your options are practically endless!
